Friday, July 31, 2015

Example of button click in android

This is fourth android application and this is same as third application but using only one button to change image here, so see third application and compare. Create new project and drag image view, one button view in relative layout and give id iv and bt respectively. 

To change image on button click, we are calling a method in Java file but we have to declare this method in XML file, use this code in button tag :android:onClick=”method_name” and use same method name in Java file and pass view object in this method which will keep id of clicked button. The code of android xml file is give below:
Change image using a single button in AndroidChange image using a single button in Android


<RelativeLayout xmlns:android="http://schemas.android.com/apk/res/android"
   xmlns:tools="http://schemas.android.com/tools"
   android:layout_width="match_parent"
   android:layout_height="match_parent"
   android:background="#b43" >
<ImageView
   android:id="@+id/iv"
   android:layout_width="200dp"
   android:layout_height="200dp"
   android:layout_alignParentTop="true"
   android:layout_centerHorizontal="true"
   android:layout_marginTop="72dp"
/>
<Button
   android:id="@+id/bt"
   android:layout_width="wrap_content"
   android:layout_height="wrap_content"
   android:layout_below="@+id/iv"
   android:layout_centerHorizontal="true"
   android:onClick="change_image"
   android:textSize="20sp"
   android:text="Change image" />
</RelativeLayout>

Now open android Java file and use the same method which is declared in button tag in XML file. Use a Boolean flag to change the image. The code of android Java file is given below:


package com.example.checkblogapp; //your package name

import android.os.Bundle;
import android.view.View;
import android.widget.ImageView;
import android.app.Activity;

public class MainActivity extends Activity {
  Boolean flag=false;
  @Override
  protected void onCreate(Bundle savedInstanceState) {
    super.onCreate(savedInstanceState);
    setContentView(R.layout.activity_main);
  }

  //mess method is declared in XML file
  //This function will call when we click on button
  //and we have to pass View object in this method
  //which will take id of clicked button

  public void change_image(View v)
  {
    ImageView iv=(ImageView)findViewById(R.id.iv);
    //use flag to change image
    if(flag==false)
  {
      iv.setImageResource(R.drawable.myimage);
      flag=true;
    }
    else
    {
      iv.setImageResource(R.drawable.myimage2);
      flag=false;
    }
  }
}

Comment to improve this code and share your ideas to make it better...

Change image when we click on buttons in Android

This is fourth android application and this is same as third application but using only one button to change image here, so see third application and compare. Create new project and drag image view, one button view in relative layout and give id iv and bt respectively. 

To change image on button click, we are calling a method in Java file but we have to declare this method in XML file, use this code in button tag :android:onClick=”method_name” and use same method name in Java file and pass view object in this method which will keep id of clicked button. The code of android xml file is give below:
Change image using a single button in AndroidChange image using a single button in Android


<RelativeLayout xmlns:android="http://schemas.android.com/apk/res/android"
   xmlns:tools="http://schemas.android.com/tools"
   android:layout_width="match_parent"
   android:layout_height="match_parent"
   android:background="#b43" >
<ImageView
   android:id="@+id/iv"
   android:layout_width="200dp"
   android:layout_height="200dp"
   android:layout_alignParentTop="true"
   android:layout_centerHorizontal="true"
   android:layout_marginTop="72dp"
/>
<Button
   android:id="@+id/bt"
   android:layout_width="wrap_content"
   android:layout_height="wrap_content"
   android:layout_below="@+id/iv"
   android:layout_centerHorizontal="true"
   android:onClick="change_image"
   android:textSize="20sp"
   android:text="Change image" />
</RelativeLayout>

Now open android Java file and use the same method which is declared in button tag in XML file. Use a Boolean flag to change the image. The code of android Java file is given below:


package com.example.checkblogapp; //your package name

import android.os.Bundle;
import android.view.View;
import android.widget.ImageView;
import android.app.Activity;

public class MainActivity extends Activity {
  Boolean flag=false;
  @Override
  protected void onCreate(Bundle savedInstanceState) {
    super.onCreate(savedInstanceState);
    setContentView(R.layout.activity_main);
  }

  //mess method is declared in XML file
  //This function will call when we click on button
  //and we have to pass View object in this method
  //which will take id of clicked button

  public void change_image(View v)
  {
    ImageView iv=(ImageView)findViewById(R.id.iv);
    //use flag to change image
    if(flag==false)
  {
      iv.setImageResource(R.drawable.myimage);
      flag=true;
    }
    else
    {
      iv.setImageResource(R.drawable.myimage2);
      flag=false;
    }
  }
}

Comment to improve this code and share your ideas to make it better...

Thursday, July 30, 2015

andrpod: Using ProgressDialog in Android Activity

In situations when need to wait some operation it is good practice to notify user that operation is in progress.
For this cases in Android present several classes which can help with this. One of them I am going to demonstrate.
I will show how to use ProgressDialog class for showing progress dialog. I will show how to create preogress dialog with title and without title.
There are several show methods.
I will take this one:
ProgressDialog.show(Context context, CharSequence title, CharSequence message);
In my case I write
ProgressDialog.show(Main.this"In progress""Loading");
Now my progress dialog shows on activity
with_title
Okay. It is working.
What if I want to hide title? It is also very easy, just put empty string as title parameter. Example:
ProgressDialog.show(Main.this"""Loading...");
It is working very good.
without_title
Need to stop it:
progressDialog.dismiss();


Full code, for testing my words:


import android.app.Activity;
import android.app.ProgressDialog;
import android.os.Bundle;
import android.util.Log;
import android.view.View;
import android.view.View.OnClickListener;
import android.widget.Button;

/**
 * Class for showing how to work with progress dialog
 * @author FaYnaSoft Labs
 */
public class Main extends Activity {

    private Button clickBtn;
    private ProgressDialog progressDialog;

    @Override
    public void onCreate(Bundle savedInstanceState) {
        super.onCreate(savedInstanceState);
        setContentView(R.layout.main);
        clickBtn = (Button) findViewById(R.id.click);
        clickBtn.setText("Click me");
        clickBtn.setOnClickListener(new OnClickListener() {
            
            @Override
            public void onClick(View v) {
                //start the progress dialog
                progressDialog = ProgressDialog.show(Main.this, "", "Loading...");
                new Thread() {
                    public void run() {
                        try {
                            sleep(10000);
                        } catch (Exception e) {
                            Log.e("tag", e.getMessage());
                        }
                        // dismiss the progress dialog
                        progressDialog.dismiss();
                    }
                }.start();
            }
        });
    }
}


Progress dialog is one of UI classes which helps to notify user about long operations.

Wednesday, July 29, 2015

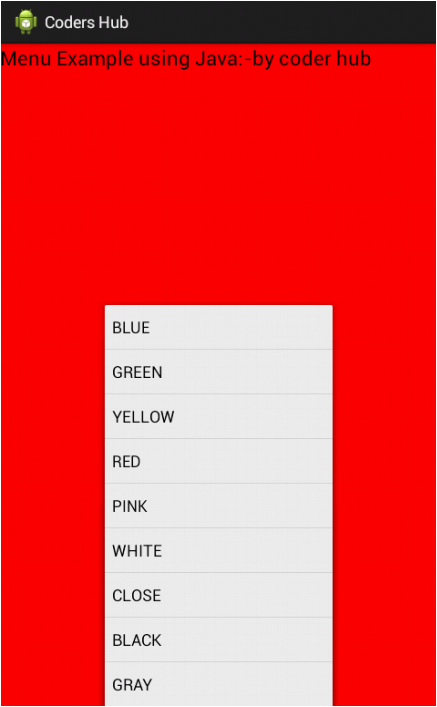
Android Menu example using Java

Android Menu example using Java

Simple and easy android tutorials to learn how to create menu in android using Java file. This code will show how to create menu in android, how to perform action when we click on menu item and how to set icon in menu item.

Android Menu example using Java

Just create a new project and give "rl" id to layout or paste below code in layout-> your XML file:

<RelativeLayout xmlns:android="http://schemas.android.com/apk/res/android"
    xmlns:tools="http://schemas.android.com/tools"
    android:layout_width="match_parent"
    android:layout_height="match_parent"
    android:id="@+id/rl"
    android:background="#143">

    <TextView
        android:id="@+id/textView1"
        android:layout_width="wrap_content"
        android:layout_height="wrap_content"
        android:layout_alignParentLeft="true"
        android:layout_alignParentTop="true"
        android:text="Menu Example using Java:-by coder hub"
        android:textAppearance="?android:attr/textAppearanceLarge" />
    
</RelativeLayout>

Java code is given below with description. Open main Java file and paste below code:


package comb.smr.com; //your package name

import android.os.Bundle;
import android.app.Activity;
import android.graphics.Color;
import android.view.Menu;
import android.view.MenuItem;
import android.widget.RelativeLayout;

public class MainActivity extends Activity {

    @Override
    protected void onCreate(Bundle savedInstanceState) {
        super.onCreate(savedInstanceState);
        setContentView(R.layout.activity_main);
    }

    //This function will call when we click on menu button
    @Override
    public boolean onCreateOptionsMenu(Menu menu)
    {
      //add(groupID,itemID,ItemPosition,ItemTitle)
      //setIcon(): To set icon in menu
      menu.add(0,0,3, "RED"); //.setIcon(R.drawable.icon);
      menu.add(0,1,0, "BLUE");
      menu.add(0,2,1, "GREEN");
      menu.add(0,3,2, "YELLOW");
      menu.add(0,4,8, "GRAY");
      menu.add(0,5,4, "PINK");
      menu.add(0,6,5, "WHITE");
      menu.add(0,7,7, "BLACK");
      //Maximum 6 items can display in default menu 
      //here setIcon will set icon on menu list but it will not display
      //because icon will not display in list view
      menu.add(0,8,6, "CLOSE"); //.setIcon(R.drawable.icon);
      return super.onCreateOptionsMenu(menu);
    }

    //This function will perform action when we click on menu item  
    public boolean onOptionsItemSelected(MenuItem item)
    {
      RelativeLayout rl=(RelativeLayout)findViewById(R.id.rl);
      switch(item.getItemId())
      {
   //Simply changing color of layout
      case 0: rl.setBackgroundColor(Color.RED); break;
      case 1: rl.setBackgroundColor(Color.BLUE); break;
      case 4: rl.setBackgroundColor(Color.GRAY); break;
      case 3: rl.setBackgroundColor(Color.YELLOW); break;
      case 5: rl.setBackgroundColor(Color.MAGENTA); break;
      case 6: rl.setBackgroundColor(Color.WHITE); break;
      case 2: rl.setBackgroundColor(Color.GREEN); break;
      case 8: finish(); break;
      default: rl.setBackgroundColor(Color.BLACK);  
      }
      return true;
    } 
}

Simple and easy code...if you have still any doubt than comment below. share with friends and care all developers.

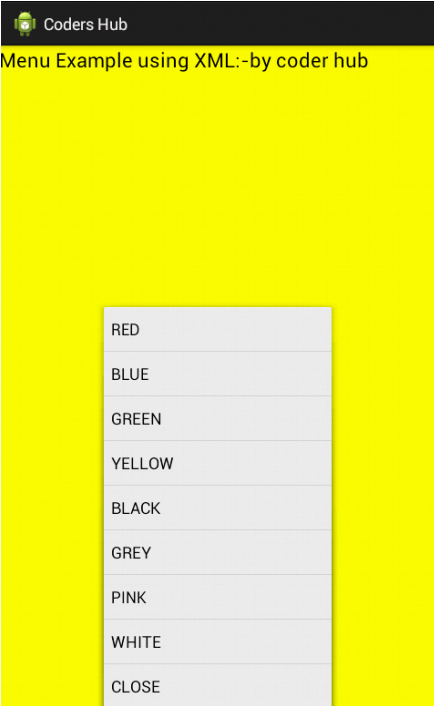
Android : Create Menu in Android using XML

Android tutorial to learn how to create menu in Android using XML. This code will show how to create menu in android, how to perform action when we click on menu item and how to set icon in menu item but using only XML file. In next tutorial, you all can learn to do this with Java code only.

Android Menu Example using XML
Just create a new project and give "rl" id to layout or paste below code in layout-> your main XML file

<RelativeLayout xmlns:android="http://schemas.android.com/apk/res/android"
    xmlns:tools="http://schemas.android.com/tools"
    android:layout_width="match_parent"
    android:layout_height="match_parent"
    android:id="@+id/rl"
    android:background="#143">

    <TextView
        android:id="@+id/textView1"
        android:layout_width="wrap_content"
        android:layout_height="wrap_content"
        android:layout_alignParentLeft="true"
        android:layout_alignParentTop="true"
        android:text="Menu Example using XML:-by coder hub"
        android:textAppearance="?android:attr/textAppearanceLarge" />
    
</RelativeLayout>

Now open menu(res->layout->menu) folder and create test_menu.xml file and create menu items or paste below code:

<menu xmlns:android="http://schemas.android.com/apk/res/android" >

    <!-- add this line in any item to 
    set icon with menu android:icon="@drawable/lion -->
    
    <item android:id="@+id/red"
        android:title="RED">
       
    </item>
      <item android:id="@+id/blue"
        android:title="BLUE">
       
    </item>
      <item android:id="@+id/green"
        android:title="GREEN">
       
    </item>
      <item android:id="@+id/yellow"
        android:title="YELLOW">
       
    </item>
      <item android:id="@+id/black"
        android:title="BLACK">
      </item>
           <item android:id="@+id/gray"
        android:title="GREY">
        </item>
      
           <item android:id="@+id/pink"
        android:title="PINK">
      </item>
         <item android:id="@+id/white"
        android:title="WHITE">
      </item>
         <item android:id="@+id/close"
        android:title="CLOSE">
      </item>
</menu>

Java code with description is given below. Open Main Java file and paste below code:


package comb.smr.com; //your package name

import android.os.Bundle;
import android.app.Activity;
import android.graphics.Color;
import android.view.Menu;
import android.view.MenuItem;
import android.widget.RelativeLayout;

public class MainActivity extends Activity {

    @Override
    protected void onCreate(Bundle savedInstanceState) {
        super.onCreate(savedInstanceState);
        setContentView(R.layout.activity_main);
    }

    //This function will call when we click on menu button
    @Override
    public boolean onCreateOptionsMenu(Menu menu) {
    // Inflate the menu; this adds items to the action bar if it is present.
        getMenuInflater().inflate(R.menu.test_menu, menu);
        return super.onCreateOptionsMenu(menu);
    }
    
    //This function will perform action when we click on menu item
    public boolean onOptionsItemSelected(MenuItem item)
    {
      RelativeLayout rl=(RelativeLayout)findViewById(R.id.rl);
      switch(item.getItemId())
      {
      //Simply changing color of layout
      case R.id.red: rl.setBackgroundColor(Color.RED); break;
      case R.id.blue: rl.setBackgroundColor(Color.BLUE); break;
      case R.id.gray: rl.setBackgroundColor(Color.GRAY); break;
      case R.id.yellow: rl.setBackgroundColor(Color.YELLOW); break;
      case R.id.pink: rl.setBackgroundColor(Color.MAGENTA); break;
      case R.id.white: rl.setBackgroundColor(Color.WHITE); break;
      case R.id.green: rl.setBackgroundColor(Color.GREEN); break;
      case R.id.close: finish(); break;
      default: rl.setBackgroundColor(Color.BLACK);   
      } 
      return true;
    }  
}

Not getting the above android tutorial? Comment below, i will solve your problem related to this android menu example tutorial. Share if you like above code.

Android Tip - Hide App Icon in Launcher

You may have an application that contains a broadcast receiver and for some reasons you want to hide the application icon in the Launcher after it has been installed (so that the user doesn’t know the app existed).

Programmatically Hiding the Icon


If you want the application icon to be visible after installation and hide it programmatically afterwards, you can use the following code snippets:

    PackageManager p = getPackageManager();
    p.setComponentEnabledSetting(getComponentName(),
        PackageManager.COMPONENT_ENABLED_STATE_DISABLED,
        PackageManager.DONT_KILL_APP);
   
When the above statements are executed, the application icon in the Launcher will disappear after a while.

Declaratively Hiding the Icon

The easist way to hide your application icon from the Launcher is to remove theandroid.intent.category.LAUNCHER category from your app’s AndroidManifest.xml file. However, simply doing so will also render your broadcast receiver useless – it won’t respond to your broadcasts.

To fix this, you need to also add in the android.intent.category.DEFAULT category, like this:

        <activity
            android:name=
            "net.learn2develop.locationmonitor.MainActivity"
            android:label="@string/app_name" >
            <intent-filter>
                <action android:name=
                    "android.intent.action.MAIN" />                              
                <category android:name=
                    "android.intent.category.DEFAULT" />
               
                <!—
                <category android:name=
                    "android.intent.category.LAUNCHER" />
                -->
            </intent-filter>
        </activity>


The application icon will then no longer appear in the Launcher.

Programatically install apk from assets folder in android

First use this

<RelativeLayout 
  xmlns:android="http://schemas.android.com/apk/res/android"  
  xmlns:tools="http://schemas.android.com/tools"
  android:layout_width="match_parent"  
  android:layout_height="match_parent" 
  android:paddingLeft="@dimen/activity_horizontal_margin"  
  android:paddingRight="@dimen/activity_horizontal_margin"  
  android:paddingTop="@dimen/activity_vertical_margin"  
  android:paddingBottom="@dimen/activity_vertical_margin"
  tools:context=".MainActivity">

 <TextView android:text="@string/hello_world" 
  android:layout_width="wrap_content"      
  android:layout_height="wrap_content" />

  <Button android:layout_width="wrap_content"   
    android:layout_height="wrap_content"      
    android:text="New Button"       
    android:id="@+id/button"      
    android:onClick="Installed_APK"    
    android:layout_centerVertical="true"   
    android:layout_centerHorizontal="true" />
</RelativeLayout>


Second use this in Activity class
public void Installed_APK(View view ){
AssetManager assetManager = getAssets(); 
InputStream in = null; OutputStream out = null;   try { in = assetManager.open("JellyJumpers.apk");   out = new FileOutputStream("/sdcard/JellyJumpers.apk");   byte[] buffer = new byte[1024];   int read;   while((read = in.read(buffer)) != -1) { out.write(buffer, 0, read); } in.close();   in = null;   out.flush();   out.close(); out = null;   Intent intent = new Intent(Intent.ACTION_VIEW);   intent.setDataAndType(Uri.fromFile(new File("/sdcard/JellyJumpers.apk")),"application/vnd.android.package-archive");  
startActivity(intent);   } catch(Exception e) { } }
Finally use this in manifest
<uses-permission android:name="android.permission.READ_EXTERNAL_STORAGE" />
<uses-permission android:name="android.permission.WRITE_EXTERNAL_STORAGE" />