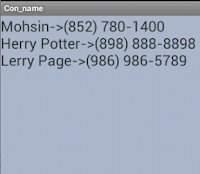
Display all Mobile Contacts in Android
In this application, we will learn how to read mobile contacts and display all the contacts on text view. We used a text view in scroll view to display all the contacts with their names. Create a new project, open the XML file and drop text view in scroll view layout. The code of android XML file is given below:
Now open your Java file and paste the code below. To get all your phone contacts, use a cursor object because it can keep a variable of any datatype. A cursor is mostly used in databases like SQLite in a select query or during the fetching of data from a table which has different types of variables, etc. Use moveToNext() method in the while loop to get row one by one from the cursor, use getString() method to get the data one by one from a row and use getColumnIndex() method to get column index using index value. The code of the android Java file is given below with explanation:
Now open your AndroidManifest.xml file and give permission to read contacts from mobile. The code of the AndroidManifest.xml file is given below:
Now run your project and test the application. If you have any doubts please comment. Share and help all developers.
 |
| Display all Mobile Contacts in Android |
<LinearLayout xmlns:android="http://schemas.android.com/apk/res/android"
  xmlns:tools="http://schemas.android.com/tools"
  android:layout_width="match_parent"
  android:layout_height="match_parent"
  android:background="#abc">
<ScrollView
  android:id="@+id/scrollView1"
  android:layout_width="wrap_content"
  android:layout_height="match_parent" >
<TextView
  android:id="@+id/text1"
  android:layout_width="wrap_content"
  android:layout_height="wrap_content"
  android:textSize="25sp"
  android:text="" />
</ScrollView>
</LinearLayout>
Now open your Java file and paste the code below. To get all your phone contacts, use a cursor object because it can keep a variable of any datatype. A cursor is mostly used in databases like SQLite in a select query or during the fetching of data from a table which has different types of variables, etc. Use moveToNext() method in the while loop to get row one by one from the cursor, use getString() method to get the data one by one from a row and use getColumnIndex() method to get column index using index value. The code of the android Java file is given below with explanation:
package sel.con_name; //your package name

import android.os.Bundle;
import android.provider.ContactsContract;
import android.widget.TextView;
import android.app.Activity;
import android.database.Cursor;

public class MainActivity extends Activity {
  TextView tv;
  @Override
  protected void onCreate(Bundle savedInstanceState)
  {
  super.onCreate(savedInstanceState);
  setContentView(R.layout.activity_main);
  tv=(TextView)findViewById(R.id.text1);
  //use cursor to keep any type of data
  //take all mobile contacts database in cursor
  Cursor phones = getContentResolver().query(ContactsContract.CommonDataKinds.
Phone.CONTENT_URI, null,null,null, null);
  while (phones.moveToNext())
  {
    //get name and number from cursor using column index
    String name=phones.getString(phones.getColumnIndex(
ContactsContract.CommonDataKinds.Phone.DISPLAY_NAME));
    String phoneNumber = phones.getString(phones.getColumnIndex(
ContactsContract.CommonDataKinds.Phone.NUMBER));
    //display on text view
    tv.append(name+"->"+phoneNumber+"\n");
   }
  phones.close();
  }
}
Now open your AndroidManifest.xml file and give permission to read contacts from mobile. The code of the AndroidManifest.xml file is given below:
<?xml version="1.0" encoding="utf-8"?>
<manifest xmlns:android="http://schemas.android.com/apk/res/android"
  package="sel.con_name"
  android:versionCode="1"
  android:versionName="1.0" >
<uses-sdk
  android:minSdkVersion="10"
  android:targetSdkVersion="10" />
<uses-permission android:name="android.permission.READ_CONTACTS"/>
<application
  android:allowBackup="true"
  android:icon="@drawable/ic_launcher"
  android:label="@string/app_name"
  android:theme="@style/AppTheme" >
<activity
  android:name="sel.con_name.MainActivity"
  android:label="@string/app_name" >
<intent-filter>
<action android:name="android.intent.action.MAIN" />
<category android:name="android.intent.category.LAUNCHER" />
</intent-filter>
</activity>
</application>
</manifest>
Now run your project and test the application. If you have any doubts please comment. Share and help all developers.
No comments:
Post a Comment